Limelight XE ships with an integrated database engine based on SQLite version 3. For many applications, using the internal database is acceptable, however for larger or centralized applications using a higher performance database engine such as MSSQL or MySQL is desirable. In this tutorial we will cover connecting to external databases including required connection strings as well as configuring and migrating the many modules and drivers that depend on database functions.
Prerequisites
Connections to a database engine such as MySQL or MSSQL require an ODBC driver. These drivers are available from the providers of the engine and should be installed on the same machine as the Limelight XE server. Before attempting to make a database connection with limelight, verify that the drivers are installed. To do this open Control Panel and navigate to the Administrative tools, ODBC Data Sources (32 bit). Open the tool and select the Drivers tab... if there are many drivers installed, scroll down to verify the drivers are installed for the database engine you wish to use. The example below shows both the ANSI and Unicode drivers for MySQL are installed. If they are missing from the list, close the tool, download and install the drivers and check again.

Connecting to External Databases
Many IT professionals are already familiar with connecting to external databases with connection strings, so Limelight XE's connection mechanisms will be familiar. To connect to a database, use the Limelight XE console, log into your Limelight XE server with administrative rights and do the following:
Click the Components tab and on the left "Server Components" view, sort alphabetically and expand the Storage object in the tree view, select "Database Connections", right click and a pop-up menu will appear (see below).

Click "New" and a new database connection object will be created (optionally you can simply press Ctrl-N). Once your new connection object is created under the Database Connections object, select it. In the objects panel to the right, select the Properties tab which will show you the default values for the new connection.
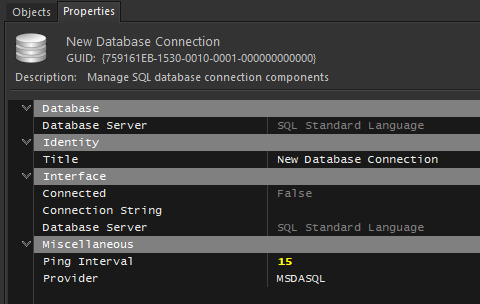
The two most important properties for this object to connect is the Connection String and the Provider. The provider property enumerates all ActiveX Data Object (ADO) providers on the machine making it easy to select the correct one. Operationally for Limelight XE database tables, there are only a few providers that you will need since the database connectivity expects a SQL engine at the other side. The two most common will be MSDASQL (the default as shown above for MySQL) and SQLNCLI11 (MSSQL).
Once you have decided on which SQL engine you will be using (MySQL or MSSQL), select the correct provider from the drop down in the property editor and press update. Next you will require a connection string which tells the connection object where to connect and provide the correct credentials. Below are two example connection strings to get you started, however they can be very system dependent. If you have questions on the correct connection string required for a specific SQL engine and database, please contact your IT department or try ConnectionStrings.com which is dedicated to providing connection strings for a multitude of data sources.
MySQL 8.0 Connection String (use provider MSDASQL)
DRIVER={MySQL ODBC 8.0 Unicode Driver}; SERVER=MyServerAddress; PORT=3306; DATABASE=MyDatabaseName; USER=MyUserName; PASSWORD=MyPassword; FOUND_ROWS=1;
MSSQL Express Connection String (use provider SQLNCLI11)
Driver={SQL Server Native Client 11.0}; Server=(local)\SQLEXPRESS; Trusted_Connection=Yes; Database=MyDatabaseName;
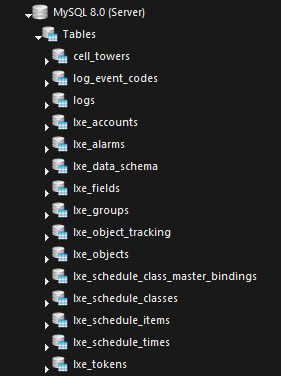
Once you update the provider and connection string to the correct values, the connection object will immediately connect and request all SQL tables in the database and their structure - see the example below.
Migrating Local (SQLite) Tables to External Databases
Once you have a valid connection to your external SQL database, you can create and migrate the system tables from the SQLite local database to the external database. The core system and all drivers that use database connections (e.g. Video Driver) register their table structures with the migration tool. This tool can be found on the console's main menu (TOOLS -> DATABASE -> REMOTE DATABASE TABLE MANAGER). You must be logged in with administrative rights to access the tool.
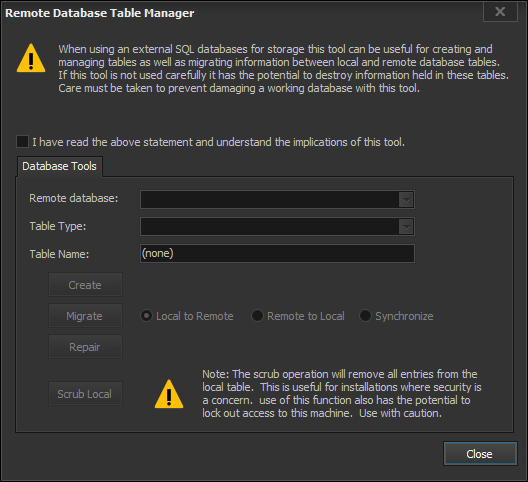
To use the tool you must read and agree to the terms of use every time you use it - once you have read and agreed to the terms, click the "I have read the above statement and understand the implications of this tool" check box. This will unlock the functionality and you may proceed to use it at your own risk.
Once you have enabled the tool, you can begin the process of moving the data from the local tables to external tables. First, select the database connection you wish to use in the Remote database drop down (only active connections will be listed). Next select one of the registered table types (for more information on table types - see the reference document). When you select a table type, the system default name will automatically populate the Table Name field. If this conflicts with an existing table, you can rename it here.
Once the table is identified, press the Create button. This will attempt to create an identical table structure on the external database with the name provided. If the table already exists, the tool will evaluate the structure. If it appears correct, it will advise with a dialog. If the table was successfully created, a dialog will appear indicating success.
If the create operation was successful, or you simply wish to copy the entire local table to the external database table, select "Local to Remote" and click the Migrate button. This will operate on each record (row) to see if the key field exists in the remote database... if it does, the tool will skip that row and continue to the next. If the external database table has been re-indexed this may fail and data corruption could occur. Use caution.
If you suspect the external table is damaged structurally, the tool has a repair function. As above, select the table type and name you wish to repair - they must match the external table (e.g. the name must match and it should be the same structure). Click repair - a warning dialog will appear... if you agree to what the tool is about to do, click OK and the tool will first analyze the structure and if damaged (e.g. missing a column), it will attempt to correct the structural error. This will only work on certain non-critical tables (it will not work on tables that have security hashes such as the account or token tables).
Removing Data from Local Tables
The last and possibly most potentially devastating operation is Scrub Local. This function completely removes all entries from the local table specified in Table Type (not the external table). For higher security, once a system is set up and all tables migrated to an external database, an administrator may wish to completely remove all entries in the local database table (e.g. the lxe_accounts or lxe_tokens tables). This operation can be done with this tool or with the optional Limelight XE Schema Explorer. Use caution as this operation cannot be undone...
Database Engine Dependencies
One final note regarding external database engines such as MySQL or MSSQL... once Limelight XE is using tables that are part of these engines, their services must start before the Limelight XE service or it will fail to start correctly. To set a dependency to the database engine, use the Registry Editor and follow these instructions:
- Navigate to HKEY_LOCAL_MACHINE\SYSTEM\CurrentControlSet\Services\ACE_Service
- Create a new value name "DependOnService" (without the quotation marks) with a data type of REG_MULTI_SZ
- Edit the new entry and add the name of the database engine service (e.g. MySQL80) you want Limelight XE's service to wait for.
- Click OK
- Close the Registry Editor
Once completed, the next time the machine is restarted, or cold started Limelight XE's service will be delayed until the database engine (e.g. MySQL80) has started. This will prevent Limelight XE from attempting to access the connection when the database engine service has not started.
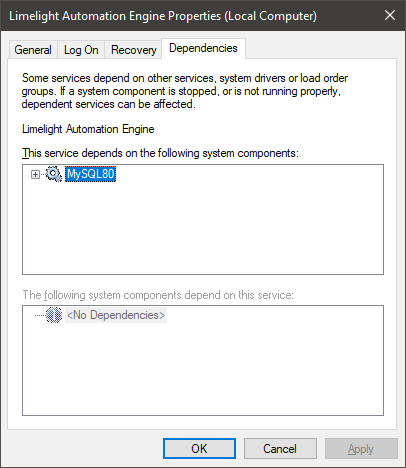
To verify the dependency, you can use Control Panel / Administrative Tools / Services application to view them. Open the Services application and locate the Limelight XE service. Double click the entry or right click and select Properties. Click the Dependencies tab... you will see the dependencies you just set up (see example below)