
Overview
This tutorial provides an introduction to the Limelight XE alarm and procedure management system which is tightly integrated with all subsystems of the core engine. It contains a user interface within the main Limelight XE console as well as mechanisms to link alarms and procedures to display walls or individual operator controls.
Prerequisites
- Limelight XE installed and activated.
- A basic understanding of alarm management.
Introduction
With the advent of modern computerized control rooms alarm management has become a critical element in situational awareness and proper operational action. In a poorly designed system alarms can overwhelm operators during an incident which can lead to incorrect choices or in extreme cases a complete system failure.
Limelight XE was built with industrial automation as a core functionality, but it is not limited to that. Alarms can be caused by many sources and due to the high level of flexibility built into the core Limelight XE engine, it is quite easy to design an alarm system that could easily overwhelm an operator or even a room of operators. The good news is there are mechanisms that can be employed to prevent alarm flooding and provide the correct level of alarms to operators including levels of automation through either direct control or scripting.
In the following sections and lessons, we will discuss how the Limelight XE alarm system operates and how procedures are tied to alarms to aid operators in making the correct choices during events.
Tools for Alarms
There are several tools that can be configured by control room designers that can aid operators in making critical decisions. There are two configuration dialogs on the main console accessed via the main menu items:
- View -> Options -> Alarm Management Options - Set the alarm visual and audible options (stored locally in limelight_xe.ini).
- Tools -> Alarm Priorities - Set the options for each alarm type (set in the server and stored in the system database).
Alarm Management Options Dialog
The alarm management Options dialog sets the visual and audible aspects of the seven alarm levels ranging from advisory to critical. This configuration can be done one time on a master station and then deployed by copying the limelight_xe.ini file (found in the ProgramData\Limelight directory) to the operator consoles.
Detail of Alarm Management Options dialog showing various display and audible options

This dialog is divided into three major sections; the left / top area is used to set the individual alarm level settings and the right / top side is used for global alarm settings. The bottom shows how the visual changes will appear in the Alarm tab of the console if updated. Each organization may have their own symbol and color requirements for each alarm level and this dialog allows the designers (or operators) to configure their settings to meet those requirements. There are seven shape and unlimited color options as well as the ability to set a specific wave file (for audible alarms) for each alarm level.
One important setting is the Auto Sort option (upper right corner of the dialog) which will set the alarm display to automatically sort highest alarms to the top (sorting within levels by time stamp). This puts the most critical alarms at the top of the list. using this option in conjunction with dynamic escalation will always place the most critical alarms in view. When this is set, column sorting (the ability to click a column header to sort alarms based on that column in ascending or descending order) is disabled.
Alarm Priority Manager Dialog
This dialog is used to configure each alarm code's properties to limit what operators will handle. This also sets which alarms can trigger procedures - the minimum level is Advisory to allow that event to trigger a procedure. If an event code is disabled or the Alarm Priority is set to "None" the alarm will not occur but it will be logged.
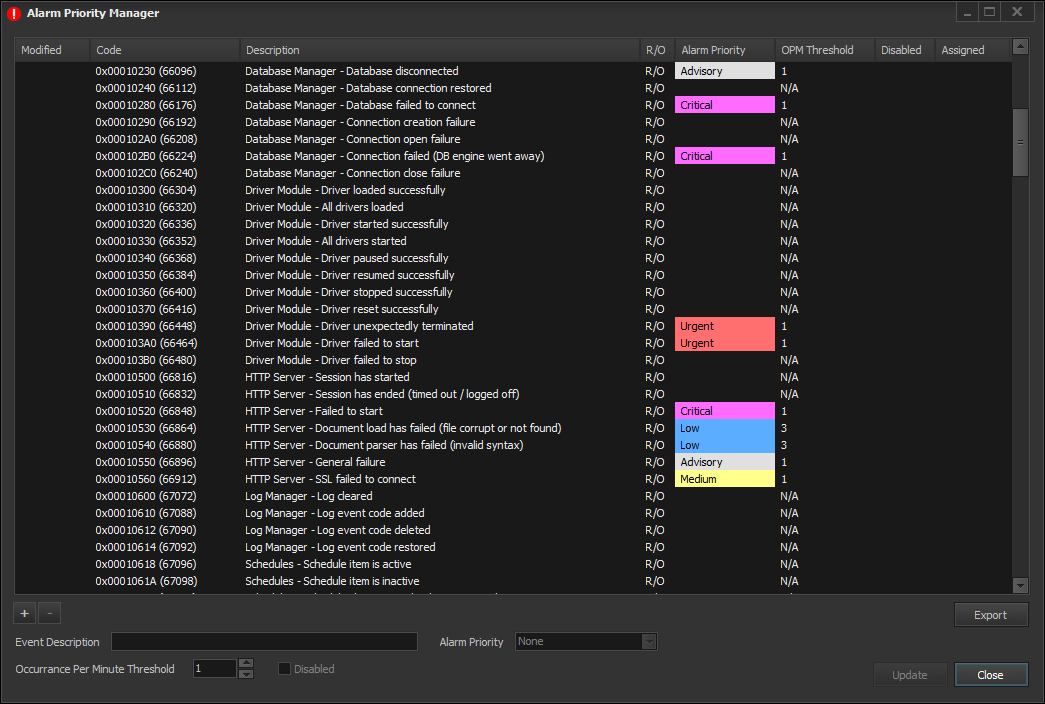
To change any alarm event, select the row where it appears, adjust the settings at the bottom and update the server by pressing the Update button. Multiple changes can be made and then saved with a single update operation. Only administrator level users can make changes to this event priorities which are stored in the server's database.